Unity 与 iOS 工程桥接介绍
Published in:2024-01-09 | category: sdk reading:

Unity 侧

ipa 包体构建流程

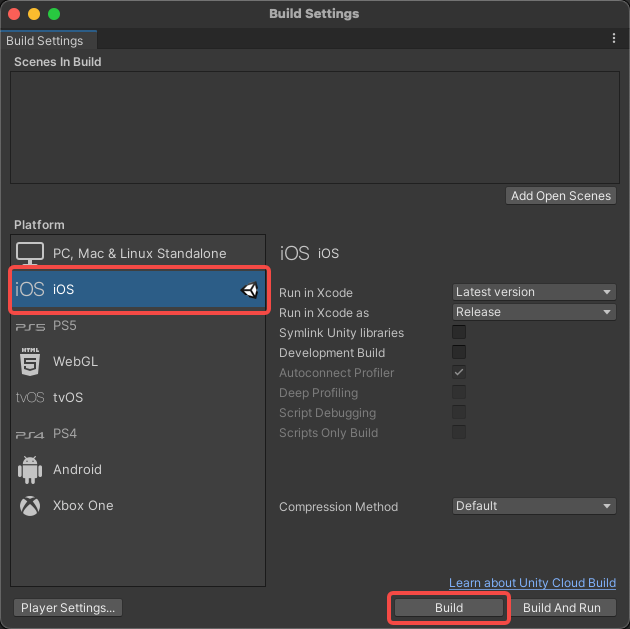
  1. 在 Mac 上启动 Unity,在 Unity 的 BuildSettings 界面选择 iOS 平台,点击 Build 按钮后即开始导出 XCode 工程。或调用 Unity 命令行工具完成此步操作。
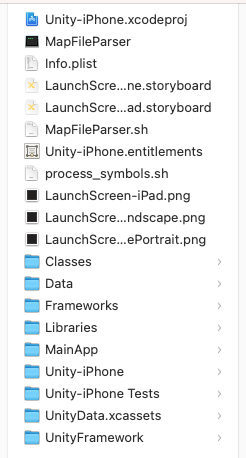
导出后的 Xcode 工程结构如下图
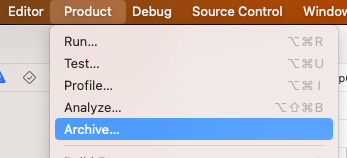
2.双击 Unity-iPhone.xcodeproj,打开 Xcode,在 Xcode 顶部栏点击 Product/Archive 开始构建档案。或调用 Xcode 命令行工具完成此步操作。
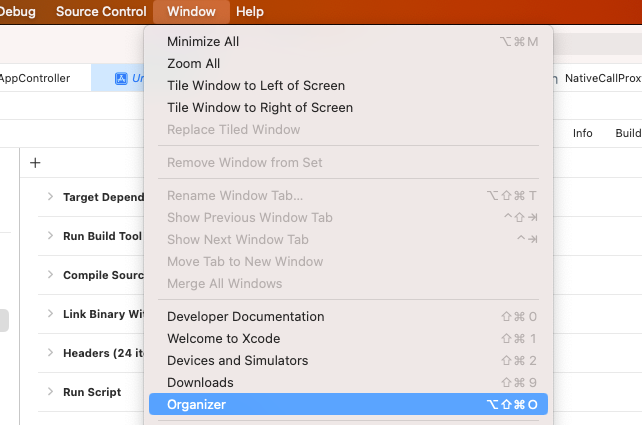
3.在 Xcode 顶部栏点击 Window/Organizer 进行分发,根据出包需求选择不同的证书导出对应 ipa 安装包文件。或调用 Xcode 命令行工具完成此步操作。
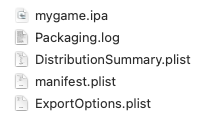
最终导出的 ipa 文件和日志文件如下图
总结:对于使用 Unity 开发的游戏,每次打包都相当于重新产生一个 Xcode 工程。当游戏的美术资源,代码文件,配置文件发生变更后,通常需要重新导出一份新的 Xcode 工程。

Unity 工程目录结构简介

不同游戏的 Unity 目录结构不同,其中 Unity 对一些目录做了特殊定义,此类文件夹不能更名,否则 Unity 会识别不到。

以下列举了一个 Unity 游戏工程的大概目录结构(加粗的为 Unity 特殊定义的目录名)

Assets

Library //Unity 针对 Assets 下的文件生成的适合自身读写的中间文件

Packages //存放 Unity Package Manager 扩展包文件

ProjectSettings //存放 Unity 项目设置文件

Temp //存放临时文件,随 Unity 进程关闭被清空

创建桥接文件

1.在 Assets/Plugins/iOS 目录下创建以下文件(文件名称随意)

2.编辑 MyAppController.h(属于各 Unity 项目的通用做法,网上有很多示例)

注意点:

(1)必须继承自 UnityAppController

1
2
3
4
5
6
7
8
9
10
11
12
13
14
//
// MyAppController.h
// Unity-iPhone
//

#ifndef MyAppController_h
#define MyAppController_h
#import "UnityAppController.h"

@interface MyAppController : UnityAppController
- (NSString*)BOOLToNSString:(BOOL)val;
@end

#endif /* MyAppController_h */

3.编辑 MyAppController.mm(也属于各 Unity 项目的通用做法,网上有很多示例)

注意点:

(1)最后一行必须写 IMPL_APP_CONTROLLER_SUBCLASS,这是 Unity 提供的宏。Unity 通过这个宏知道要使用我们定制的 MyAppController 而不是使用默认的 UnityAppController。

(2)新建的函数必须在对应的头文件里提前声明

1
2
3
4
5
6
7
8
9
10
11
12
13
14
15
16
17
18
19
20
21
22
23
24
25
26
27
28
29
30
31
32
33
34
35
36
37
38
39
40
41
42
43
44
45
46
47
48
49
50
51
//
// MyAppController.mm
// Unity-iPhone
//

#import <Foundation/Foundation.h>
#import <UIKit/UIKit.h>
#import "MyAppController.h"
#import "UnityAppController.h"
#import <SDK/SDK.h>
#import "UnityInterface.h"

@implementation MyAppController

//注册app生命周期函数,调用对应的sdk代码
//例如重载程序启动成功之后自动调用的方法
- (BOOL)application:(UIApplication *)application didFinishLaunchingWithOptions:(NSDictionary *)launchOptions {
[[NSNotificationCenter defaultCenter] addObserver:self selector:@selector(paySuc:) name:kPaySuccNotification object:nil];
[[NSNotificationCenter defaultCenter] addObserver:self selector:@selector(payFail:) name:kPayErrorNotification object:nil];
return [[SDK instance] application:application didFinishLaunchingWithOptions:launchOptions];
}

//也可以写自己开发的代码,BOOL转NSString*,函数需要提前在MyAppController.h声明
- (NSString*) BOOLToNSString:(BOOL)val
{
if(val == true)
{ return @"true"; }
return @"false";
}

- (void)paySuc:(NSNotification *)notify
{
if(logToggle)
{ NSLog(@"paySuc:%@", notify.object); }
NSString *str = [notify.object description];
char* arg0 = (char*)[[NSString stringWithFormat:@"paySuc#%@", str] cStringUsingEncoding:NSUTF8StringEncoding];
UnitySendMessage("IosMessageReceiver", "Call", arg0);
}

- (void)payFail:(NSNotification *)notify
{
if(logToggle)
{ NSLog(@"payFail:%@",notify.object); }
NSString *str = [notify.object description];
char* arg0 = (char*)[[NSString stringWithFormat:@"payFail#%@", str] cStringUsingEncoding:NSUTF8StringEncoding];
UnitySendMessage("IosMessageReceiver", "Call", arg0);
}

@end

IMPL_APP_CONTROLLER_SUBCLASS(MyAppController);//*以MyAppController为启动项

4.编辑 NativeCallProxy.h

1
2
3
4
5
6
7
8
9
10
11
12
13
14
15
16
17
18
19
20
21
22
23
24
25
26
27
28
29
30
31
//
// NativeCallProxy.h
// Unity-iPhone
//

#ifndef NativeCallProxy_h
#define NativeCallProxy_h

#import <Foundation/Foundation.h>
#import "NativeCallProxy.h"
@protocol NativeCallsProtocol

@required

@end

__attribute__ ((visibility("default")))

@interface FrameworkLibAPI : NSObject
// call it any time after UnityFrameworkLoad to set object implementing NativeCallsProtocol methods
+(void) registerAPIforNativeCalls:(id<NativeCallsProtocol>) aApi;

extern BOOL logToggle;

@end

@interface NativeCallProxy : NSObject

@end

#endif /* NativeCallProxy_h */

5.编辑 NativeCallProxy.mm

注意点:

(1)被 C#调用的代码必须用 extern “C”包围

1
2
3
4
5
6
7
8
9
10
11
12
13
14
15
16
17
18
19
20
21
22
23
24
25
26
27
28
29
30
31
32
33
34
35
36
37
38
39
40
41
42
43
44
45
46
47
48
49
50
51
52
53
54
55
56
57
58
59
60
61
62
63
64
65
66
67
68
69
70
71
72
73
74
75
76
77
78
79
80
81
82
//
// NativeCallProxy.m
// Unity-iPhone
//

#import <Foundation/Foundation.h>
#import "NativeCallProxy.h"
#import "MyAppController.h"

@implementation FrameworkLibAPI

id<NativeCallsProtocol> api = NULL;
+(void) registerAPIforNativeCalls:(id<NativeCallsProtocol>) aApi
{
api = aApi;
}

BOOL logToggle = true; //全局变量:日志开关

@end

extern "C" {

char* invokeMethod(const char *method, const char *arg0);
char* makeStringCopy(const char* string);
char* pay(const char* data);
char* toggleLog(const char *data);
}

char* invokeMethod(const char *method, const char *arg0){

NSString *methodStr = [NSString stringWithUTF8String:method];
NSString *arg0Str = [NSString stringWithUTF8String:arg0];
char* returnChar = (char*)malloc(1024 * sizeof(char));
strncpy(returnChar, "", 1024);
if(strcmp(method, "pay") == 0)
{
return pay(arg0);
}
else if(strcmp(method, "toggleLog") == 0)
{
return toggleLog(arg0);
}
return (char*)[[NSString stringWithFormat:@"[invokeMethod] method missing:%@", methodStr] cStringUsingEncoding:NSUTF8StringEncoding];
}

char* toggleLog(const char *data)
{
NSString *string = [NSString stringWithUTF8String:data];
logToggle = [string isEqualToString:@"1"];
}

char* pay(const char *data)
{
NSString *string = [NSString stringWithUTF8String:data];
NSArray *array = [string componentsSeparatedByString:@","];
PayParams *params = [PayParams new];
params.roleID = [array objectAtIndex:0];
params.orderID = [array objectAtIndex:1];
params.price = @([[array objectAtIndex:2] floatValue]);

[[SDK instance] pay:params];

if(logToggle)
{
NSLog(@"invoke pay interface success. roleId = %@, orderID = %@, price = %@", params.roleID, params.orderID, params.price);
}
return makeStringCopy("");
}

char* makeStringCopy(const char* string)
{
if(string == NULL)
return NULL;
char* res = (char*)malloc(strlen(string)+1);
strcpy(res, string);
return res;
}

@implementation NativeCallProxy

@end

6.在 Assets/Scripts 目录下创建以下文件(文件名称随意)

SdkBridge_iOS.cs //调用 C 代码的 C#文件

IosMessageReceiver.cs //接收 iOS 代码发送的消息

7.编辑 SdkBridge_iOS.cs

注意点:

(1)invokeMethod 必须用 UNITY_IOS 宏包围,并且与 NativeCallProxy.mm 内的 invokeMethod 完全同名,参数一致(C#的 string 对应 C 的 char*)

(2)invokeMethod 必须加 extern 关键字,并且加[DllImport(“__Internal”)]特性标签

1
2
3
4
5
6
7
8
9
10
11
12
13
14
15
16
17
18
19
20
21
22
23
24
25
26
27
28
29
30
31
32
33
34
35
36
37
38
39
40
41
42
43
44
45
46
47
48
49
50
51
52
53
54
55
56
using System;
using System.Collections.Generic;
using UnityEngine;
#if UNITY_IOS
using System.Runtime.InteropServices;
#endif

public class SdkBridge_iOS
{
#if UNITY_IOS
[DllImport("__Internal")] private static extern string invokeMethod(string method, string arg0);
#endif
public void Init()
{
GameObject go = new GameObject("IosMessageReceiver");
go.AddComponent<IosMessageReceiver>();
IosMessageReceiver.Event_paySuc += IosMessageReceiver_Event_paySuc;
IosMessageReceiver.Event_payFail += IosMessageReceiver_Event_payFail;
}

private static string InvokeMethod(string method, string arg0)
{
#if UNITY_IOS
Debug.LogFormat("ready invoke method: {0}, arg0: {1}", method, arg0);
string returnVal = invokeMethod(method, arg0);
Debug.LogFormat("got return value: {0}", returnVal);
return returnVal;
#else
return string.Empty;
#endif
}

public void Pay(float price, string orderId, string roleId)
{
StringBuilder sb = new StringBuilder();
sb.Append(roleId).Append(',');
sb.Append(orderId).Append(',');
sb.Append(price);
string arg0 = sb.ToString();
Debug.LogFormat("pay. arg0 = {0}", arg0);
InvokeMethod("pay", arg0);
}

private void IosMessageReceiver_Event_payFail(string obj)
{
Debug.LogFormat("Received payFail. arg = {0}", obj);
//向游戏内发送支付失败消息
}

private void IosMessageReceiver_Event_paySuc(string obj)
{
Debug.LogFormat("Received paySuc. arg = {0}", obj);
//向游戏内发送支付成功消息
}

}

8.编辑 IosMessageReceiver.cs

注意点:

(1)Call 方法名必须与 MyAppController.mm 的 Call 函数名一致,参数也必须一致。

(2)IosMessageReceiver.cs 被实例化至 Unity 的场景中的哪个 GameObject 节点下,就要把这个 GameObject 的全路径填到 MyAppController.mm 的 UnitySendMessage 函数的第一个参数内。

1
2
3
4
5
6
7
8
9
10
11
12
13
14
15
16
17
18
19
20
21
22
23
24
25
26
27
28
29
30
31
32
33
34
35
36
37
38
39
40
41
42
43
44
45
46
47
48
49
50
51
52
53
54
55
56
57
58
59
using System.Collections;
using System.Collections.Generic;
using UnityEngine;
using System.Reflection;
using System;

public class IosMessageReceiver : MonoBehaviour
{
public static event Action<string> Event_paySuc;
public static event Action<string> Event_payFail;

//invoked by C
public void Call(string arg0)
{
Debug.LogFormat("[IosMessageReceiver] received arg0:{0}", arg0);
if (string.IsNullOrEmpty(arg0))
{
Debug.LogError("[IosMessageReceiver] arg0 is empty.");
return;
}
string[] args = arg0.Split('#');
string method = args[0];
object[] parameters = new object[args.Length - 1];
if (args.Length > 1)
{
for (int i = 1; i < args.Length; i++)
{
parameters[i - 1] = args[i];
}
}
MethodInfo methodInfo = this.GetType().GetMethod(method, BindingFlags.Instance | BindingFlags.NonPublic);
try
{
if (parameters.Length == 0)
{
methodInfo.Invoke(this, null);
}
else
{
methodInfo.Invoke(this, parameters);
}
}
catch (TargetInvocationException e)
{
Debug.LogErrorFormat("[IosMessageReceiver] {0}", e.Message);
}
}

private void paySuc(string arg0)
{
Event_paySuc?.Invoke(arg0);
}

private void payFail(string arg0)
{
Event_payFail?.Invoke(arg0);
}

}

总结:

(1)每次 Unity 导出 Xcode 工程后 UnityAppController 都会被复位成模版自动生成的代码,Unity 通过 IMPL_APP_CONTROLLER_SUBCLASS 帮我们解决了想要扩展 UnityAppController 代码的需求。

(2)在 C#侧使用 string invokeMethod(string arg0)可以完成大部分情况下的 C#到 C 的通信,在 C 侧使用 UnitySendMessage 可以实现 C 到 C#的通信。

在 Unity 设置 Xcode 工程参数

可直接在 Unity 编辑器内设置一部分 Xcodeproj 参数,剩下的部分只能通过代码设置。

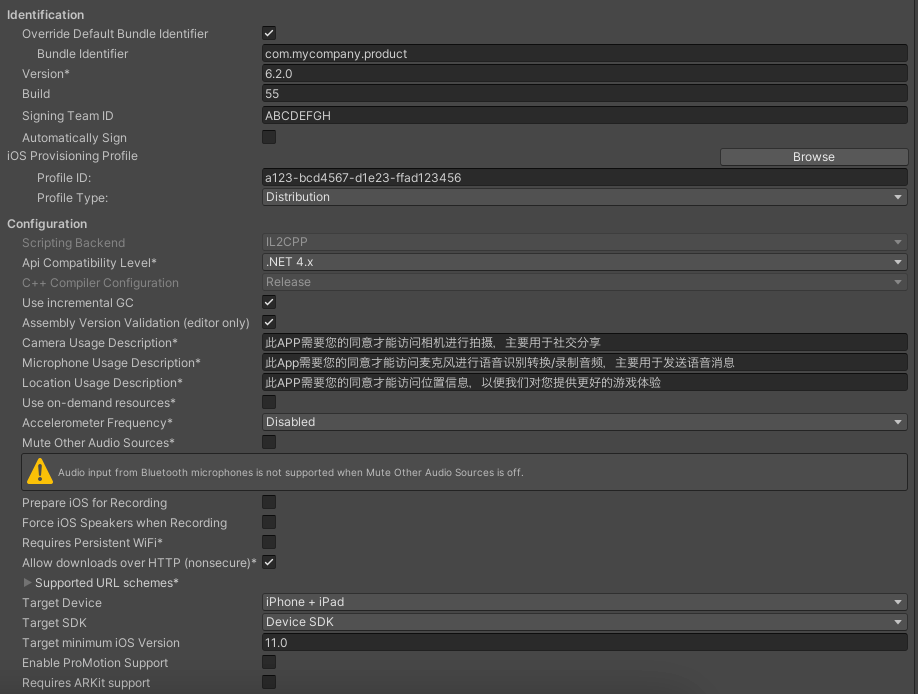
  1. Unity 的 ProjectSettings 可以设置项目层面的参数。
  1. 在 Unity 内选中*.framework 文件,可以设置依赖的其它 framework。
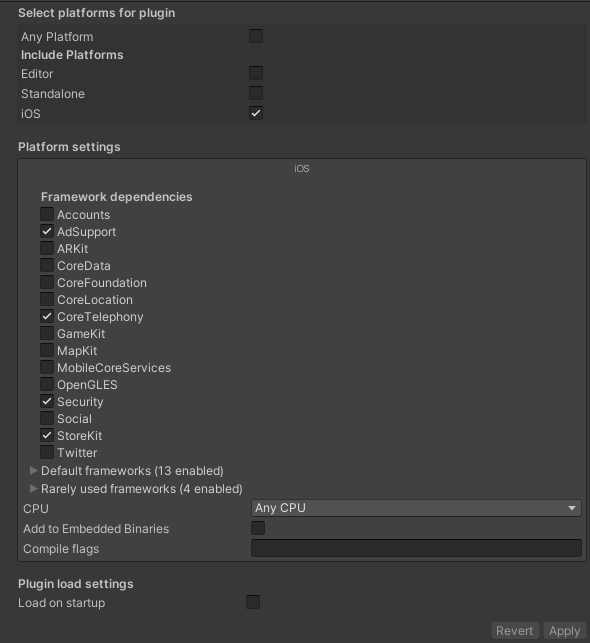
  1. 选中*.mm 文件,可以填写编译选项

以上是能通过 Unity 编辑器直接设置的部分,接下来是使用代码挂接 Unity 的打包后处理钩子函数实现更多参数注入。

在 Assets/Scripts/Editor 文件夹下创建 XcodeBuildPostprocess.cs(名字随意)

下面的代码示例了如何使用 UnityAPI 对 Xcode 工程进行修改。

注意点:

(1)方法必须声明为 static 类型,且添加 PostProcessBuildAttribute 特性。Unity 会在打 Xcode 工程的尾声阶段(Xcode 工程已被完整导出)调用所有带该特性标签的方法。

(2)该代码文件必须放在 Editor 文件夹下,或者其路径中必须包含 Editor,例如 Assets/Scripts/Editor。

1
2
3
4
5
6
7
8
9
10
11
12
13
14
15
16
17
18
19
20
21
22
23
24
25
26
27
28
29
30
31
32
33
34
35
36
37
38
39
40
41
42
43
44
45
46
47
48
49
50
51
52
53
54
55
56
57
58
59
60
61
62
63
64
65
66
67
68
69
70
71
72
73
74
75
76
77
78
79
80
81
82
83
84
85
86
87
88
89
90
91
92
93
94
95
96
97
98
99
100
101
102
103
104
105
106
107
108
109
110
111
112
113
114
115
116
117
118
119
120
121
122
123
124
125
126
127
128
129
130
131
132
133
134
135
136
137
138
139
140
141
142
143
144
145
146
147
148
149
150
151
152
153
154
155
156
157
158
159
160
161
162
163
using UnityEngine;
using UnityEditor;
using System.IO;
using System;

#if UNITY_IOS
using UnityEditor.iOS.Xcode;
using UnityEditor.Callbacks;
#endif

public class XcodeBuildPostprocess
{
#if UNITY_IOS
[PostProcessBuildAttribute(100)]
public static void OnPostprocessBuild(BuildTarget buildTarget, string pathToBuiltProject)
{
// BuildTarget需为iOS
if (buildTarget != BuildTarget.iOS)
return;
//pathToBuiltProject示例 /Users/user/Documents/build
Debug.Log("XcodeBuildPostprocess:OnPostprocessBuild start, pathToBuiltProject = " + pathToBuiltProject);
// 初始化
var projectPath = pathToBuiltProject + "/Unity-iPhone.xcodeproj/project.pbxproj";
PBXProject pbxProject = new PBXProject();
pbxProject.ReadFromFile(projectPath);
string projectGuid = pbxProject.ProjectGuid();
string unityIphoneGuid = pbxProject.GetUnityMainTargetGuid();
string unityFrameworkGuid = pbxProject.GetUnityFrameworkTargetGuid();

// 添加flag
pbxProject.AddBuildProperty(unityFrameworkGuid, "OTHER_LDFLAGS", "-ObjC");
// 关闭Bitcode
pbxProject.SetBuildProperty(unityFrameworkGuid, "ENABLE_BITCODE", "NO");
pbxProject.SetBuildProperty(projectGuid, "ENABLE_BITCODE", "NO");

//设置app名
pbxProject.SetBuildProperty(projectGuid, "PRODUCT_NAME_APP", "mygame");

//编译去除arm-v7
// pbxProject.SetBuildProperty(projectGuid, "VALID_ARCHS", "arm64");
// pbxProject.SetBuildProperty(projectGuid, "VALID_ARCHS", "arm64e");

//设置DEBUG_INFORMATION_FORMAT
//pbxProject.SetBuildProperty(projectGuid, "DEBUG_INFORMATION_FORMAT", "dwarf");
//打开Enable Objective-C Exceptions
pbxProject.SetBuildProperty(projectGuid, "GCC_ENABLE_OBJC_EXCEPTIONS", "YES");

//添加lib
AddLibToProject(pbxProject, unityFrameworkGuid, "libc++.tbd");
AddLibToProject(pbxProject, unityFrameworkGuid, "libz.tbd");
AddLibToProject(pbxProject, unityFrameworkGuid, "libresolv.tbd");
AddLibToProject(pbxProject, unityFrameworkGuid, "libsqlite3.tbd");

//将.bundle从UnityFramework的Copy Bundle Resources转移到Unity-iPhone的Copy Bundle Resources下
MoveBundleTo(pbxProject, unityFrameworkGuid, unityIphoneGuid, "whateverSdk.bundle", "assets/jackSdk.bundle");
MoveBundleTo(pbxProject, unityFrameworkGuid, unityIphoneGuid, "TencentOpenApi_IOS_Bundle.bundle", "UMSocial/SocialLibraries/QQ/QQSDK/TencentOpenApi_IOS_Bundle.bundle");
MoveBundleTo(pbxProject, unityFrameworkGuid, unityIphoneGuid, "WeiboSDK.bundle", "UMSocial/SocialLibraries/Sina/SinaSDK/WeiboSDK.bundle");
MoveBundleTo(pbxProject, unityFrameworkGuid, unityIphoneGuid, "UMSocialSDKResources.bundle", "UMSocial/UMSocialUI/UMSocialSDKResources.bundle");

//转移plist文件到Xcode工程
AddFileToProject(pbxProject, unityIphoneGuid, "Frameworks/Plugins/iOS/whatever_data_list.plist", Application.dataPath + "/Plugins/iOS/whatever_data_list.plist");

// 应用修改
File.WriteAllText(projectPath, pbxProject.WriteToString());

// 修改Info.plist文件
var plistPath = Path.Combine(pathToBuiltProject, "Info.plist");
var plist = new PlistDocument();
plist.ReadFromFile(plistPath);

//plist植入sdk参数
plist.root.SetString("SDK_AppID", "FFHkfDiesj3-sn2n79khf");
plist.root.SetString("SDK_AppKEY", "kDkctwv8FzkSFc63fvf-sSFhbM47Oas0dQfZf");
PlistElementArray plistArray = plist.root.CreateArray("LSApplicationQueriesSchemes");
plistArray.AddString("wechat");
plistArray.AddString("mqq");
plistArray.AddString("weibosdk");

//设置Info的URL Types (分享外链)
PlistElementArray urlTypes = plist.root.CreateArray("CFBundleURLTypes");

PlistElementDict url1 = urlTypes.AddDict();
url1.SetString("CFBundleTypeRole", "Editor");
PlistElementArray urlSchemes1 = url1.CreateArray("CFBundleURLSchemes");
urlSchemes1.AddString("tencent12345678");

PlistElementDict url2 = urlTypes.AddDict();
url2.SetString("CFBundleTypeRole", "Editor");
PlistElementArray urlSchemes2 = url2.CreateArray("CFBundleURLSchemes");
urlSchemes2.AddString("QQ99999");

//如果plist文件里没有下面的字段,则打开下面代码,若有则注释掉,无需重复添加
//var dict = plist.root.CreateDict("App Transport Security Settings");
//dict.SetBoolean("Allow Arbitrary Loads", true);

plist.root.SetString("NSUserTrackingUsageDescription", "此APP需要您同意才能使用数据收集功能,收集数据的作用是以便我们对您提供更好的游戏体验");
plist.root.SetString("NSPhotoLibraryUsageDescription", "此App需要您的同意才能访问相册");
plist.root.SetString("NSPhotoLibraryAddUsageDescription", "此App需要您的同意才能保存截屏图片");

//设置app在应用商店显示的语言
plist.root.SetString("CFBundleDevelopmentRegion", "zh_CN");
PlistElementArray plistArray_bundleLocalization = plist.root.CreateArray("CFBundleLocalizations");
plistArray_bundleLocalization.AddString("zh_CN");

//添加Cpability
ProjectCapabilityManager pcm = new ProjectCapabilityManager(projectPath, "Unity-iPhone.entitlements", "Unity-iPhone");
pcm.AddAssociatedDomains(new string[] { "applinks:mygame.links.com" });
pcm.AddPushNotifications(false);
pcm.WriteToFile();

// 应用修改
plist.WriteToFile(plistPath);

}

//添加lib方法
static void AddLibToProject(PBXProject inst, string targetGuid, string lib)
{
string fileGuid = inst.AddFile("usr/lib/" + lib, "Frameworks/" + lib, PBXSourceTree.Sdk);
inst.AddFileToBuild(targetGuid, fileGuid);
}

static void AddLocalFrameworkToProject(PBXProject inst, string targetGuid, string fileName, string filePath)
{
string fileGuid = inst.AddFile(filePath, "Frameworks/" + fileName, PBXSourceTree.Source);
inst.AddFileToBuild(targetGuid, fileGuid);
}

static void AddFileToProject(PBXProject inst, string targetGuid, string filePathInXcodeProj, string filePathInUnityproj)
{
string fileGuid = inst.AddFile(filePathInUnityproj, filePathInXcodeProj, PBXSourceTree.Source);
inst.AddFileToBuild(targetGuid, fileGuid);
}

static void AddBundleToProject(PBXProject inst, string targetGuid, string fileName, string filePath)
{
string fileGuid = inst.AddFile(filePath, fileName, PBXSourceTree.Source);
inst.AddFileToBuild(targetGuid, fileGuid);
}

static void RemoveBundleFromProject(PBXProject inst, string targetGuid, string fileProjectPath)
{
string fileGuid = inst.FindFileGuidByProjectPath(fileProjectPath);
if (fileGuid == null)
{
Debug.LogErrorFormat("RemoveBundleFromProject failed. fileProjectPath: {0}", fileProjectPath);
}
else
{
inst.RemoveFileFromBuild(targetGuid, fileGuid);
}
}

static void MoveBundleTo(PBXProject pbxProject, string fromTargetGuid, string toTargrtGuid, string bundleName, string bundlePathRelativeIOS)
{
string path_aofeibundle = Application.dataPath + "/Plugins/iOS/" + bundlePathRelativeIOS;
Debug.LogFormat("XcodeBuildPostprocess:OnPostprocessBuild bundleName = {0}, bundlePathInUnity = {1}", bundleName, path_aofeibundle);

AddBundleToProject(pbxProject, toTargrtGuid, bundleName, path_aofeibundle);
RemoveBundleFromProject(pbxProject, fromTargetGuid, "Frameworks/Plugins/iOS/" + bundlePathRelativeIOS);
}
#endif
}

Xcode 侧

在打 ipa 包的流程中,Xcode 侧无需进行任何 plist,xcodeproj,工程资源文件/代码的修改。

一般在接入 sdk 的过程中,我们仍会使用 Xcode 进行调试,例如在接入某 sdk 时,要求在 plist 中添加参数,那么可以先用 Unity 导出一个 Xcode 工程,在此 Xcode 工程上进行 plist 修改,再打真机包调试,无需重复从 Unity 重新导出工程。

需要注意的是,在 Xcode 调试期间作出的任何 plist 改动,必须转化为 XcodeBuildPostprocess 的代码。在 Xcode 调试期间新增或修改的任何代码,也要拷贝回 Unity 的工程目录下。

总结

从本文可以看出,ipa 包体构建的绝大部分的配置操作都是在 Unity 侧实现的,这也就降低了不熟悉 iOS 开发的 Unity 游戏开发人员打 ipa 包的难度。虽然接入一些特殊功能的 sdk 无可避免地要写 native 端的代码,但通常 sdk 方会提供完整的接入代码甚至工程示例。为了方便管理,将 native 端的代码放在 Unity 工程内利于整体维护和项目组成员 review。在 Xcode 侧进行构建和分发只需要少量的点击操作,这个过程越简单,越方便以命令的形式集成至 CI/CD 流水线。

例如按照本文介绍的方法接入 sdk,从 Unity 构建 Xcode 工程,再到 Xcode 打出 ipa 包只需要依次执行以下命令:

  1. Unity 打 Xcode 工程

/Applications/Unity/Unity.app/Contents/MacOS/Unity -batchmode -quit -nographics -executeMethod ProjectBuild.ExportXcodeProject

  1. 归档

xcodebuild archive -archivePath /Users/user/build/mygame -project /Users/user/Documents/build/Unity-iPhone.xcodeproj -scheme Unity-iPhone

  1. 分发 adhoc

xcodebuild -exportArchive -archivePath /Users/user/build/mygame.xcarchive -exportPath /Users/user/build -exportOptionsPlist /Users/user/User/ExportOptions_adhoc.plist

  1. 分发 dis

xcodebuild -exportArchive -archivePath /Users/user/build/mygame.xcarchive -exportPath /Users/user/build -exportOptionsPlist /Users/user/User/ExportOptions_appstore.plist

  1. 清理 Xcode 工程

xcodebuild clean -project /Users/user/Documents/build/Unity-iPhone.xcodeproj -scheme Unity-iPhone

受项目复杂度和计算机性能影响,从 Unity 构建一个 ipa 包花费的时间有很大不同。例如一个普通的中型手游项目 + 高性能打包机,完整的出包时间会在 1 小时左右,其中 Unity 的游戏资源打包花费 30 分钟左右,导出 Xcode 工程花费 10 分钟左右,从 Xcode 构建出最终 ipa 包花费 10 分钟左右,杂项(进程启动,git 操作,日志归档,发送报告…)花费 10 分钟左右。

Prev:
云服务器搭建博客网站全套流程(浓缩版)
Next:
Android与Unity交互之AndroidJavaProxy回调的使用